
React 19 and Server Driven UIs a Perfect Match
26 February, 2025 | 11 min readThis blog post was originally a talk given at the React.NYC Meetup on Feb 20, 2025 at G Gallery. For those of you who attended the talk you'll find a full write up, slides, and a link to the GitHub repo below. (Thank you for attending in person!)
What are Server Driven User Interfaces (SDUI)
Lets say you are building a dashboard for an application. You build the layout and the widgets that populate the layout of the dashboard and you're done! But lets say you receive a requirement that requires a slight variation of the dashboard to be created, based on a users role and permissions. You write some conditional rendering logic or you clone the existing page and make your modifications in the new page and again you're good to go! But as we all know that is the first of many requirements that will ask you to make small variations of the dashboard and very quickly the "simple" dashboard you started off with spirals into this monolith of a component(s) with dozens of lines of conditional rendering logic or duplicated code. To build interfaces like this or highly dynamic interfaces I recommend you reach for a Server Driven User Interface (SDUI) approach.
A SDUI is a method of building applications that allows the server to describe the layout and components to be rendered on a page through some sort of schema (typically in a JSON format). This is not be confused with the way most applications request data from an API to fetch a list of elements to render. An SDUI allows the server to describe the interface at a component and layout level. Lets say you're building a User Interface (UI) for a streaming service but want to personalize the order of sections, maybe some users want to see their favorites first, where as other users want to see what is trending first. You could "hard code" the logic in your UI layer to look for a flag to determine what the order of sections should be, but anytime a new section or new order needs to be supported you have to write more code in the UI layer. Instead, by allowing the server to define your interface via a schema, all your UI has to do is interpret the schema and render the correct components. By adopting this approach you can then very easily support different layouts for A/B testing, different locales (left to right vs right to left), or simply allow for the personalization and customization of your interfaces more easily.
A common misconception with SDUI is that you must adopt it on an application level to utilize it but that is not the case. You should only leverage SDUI for specific features and should not leverage it for your entire application unless your entire application truly does need to utilize the flexibility that SDUI provides.
How can React 19 Help?
Although you have been able to build SDUIs with React for many years (I've done so myself), React 19 includes a wide variety of new features/APIs that we can leverage to more efficiently build SDUIs. For the sake of time in this post we will be focusing on Server Components, Server Actions/Functions, and the useActionState hook.
SDUI + React 19 in Practice
I've created 3 examples that showcase SDUIs with React 19.
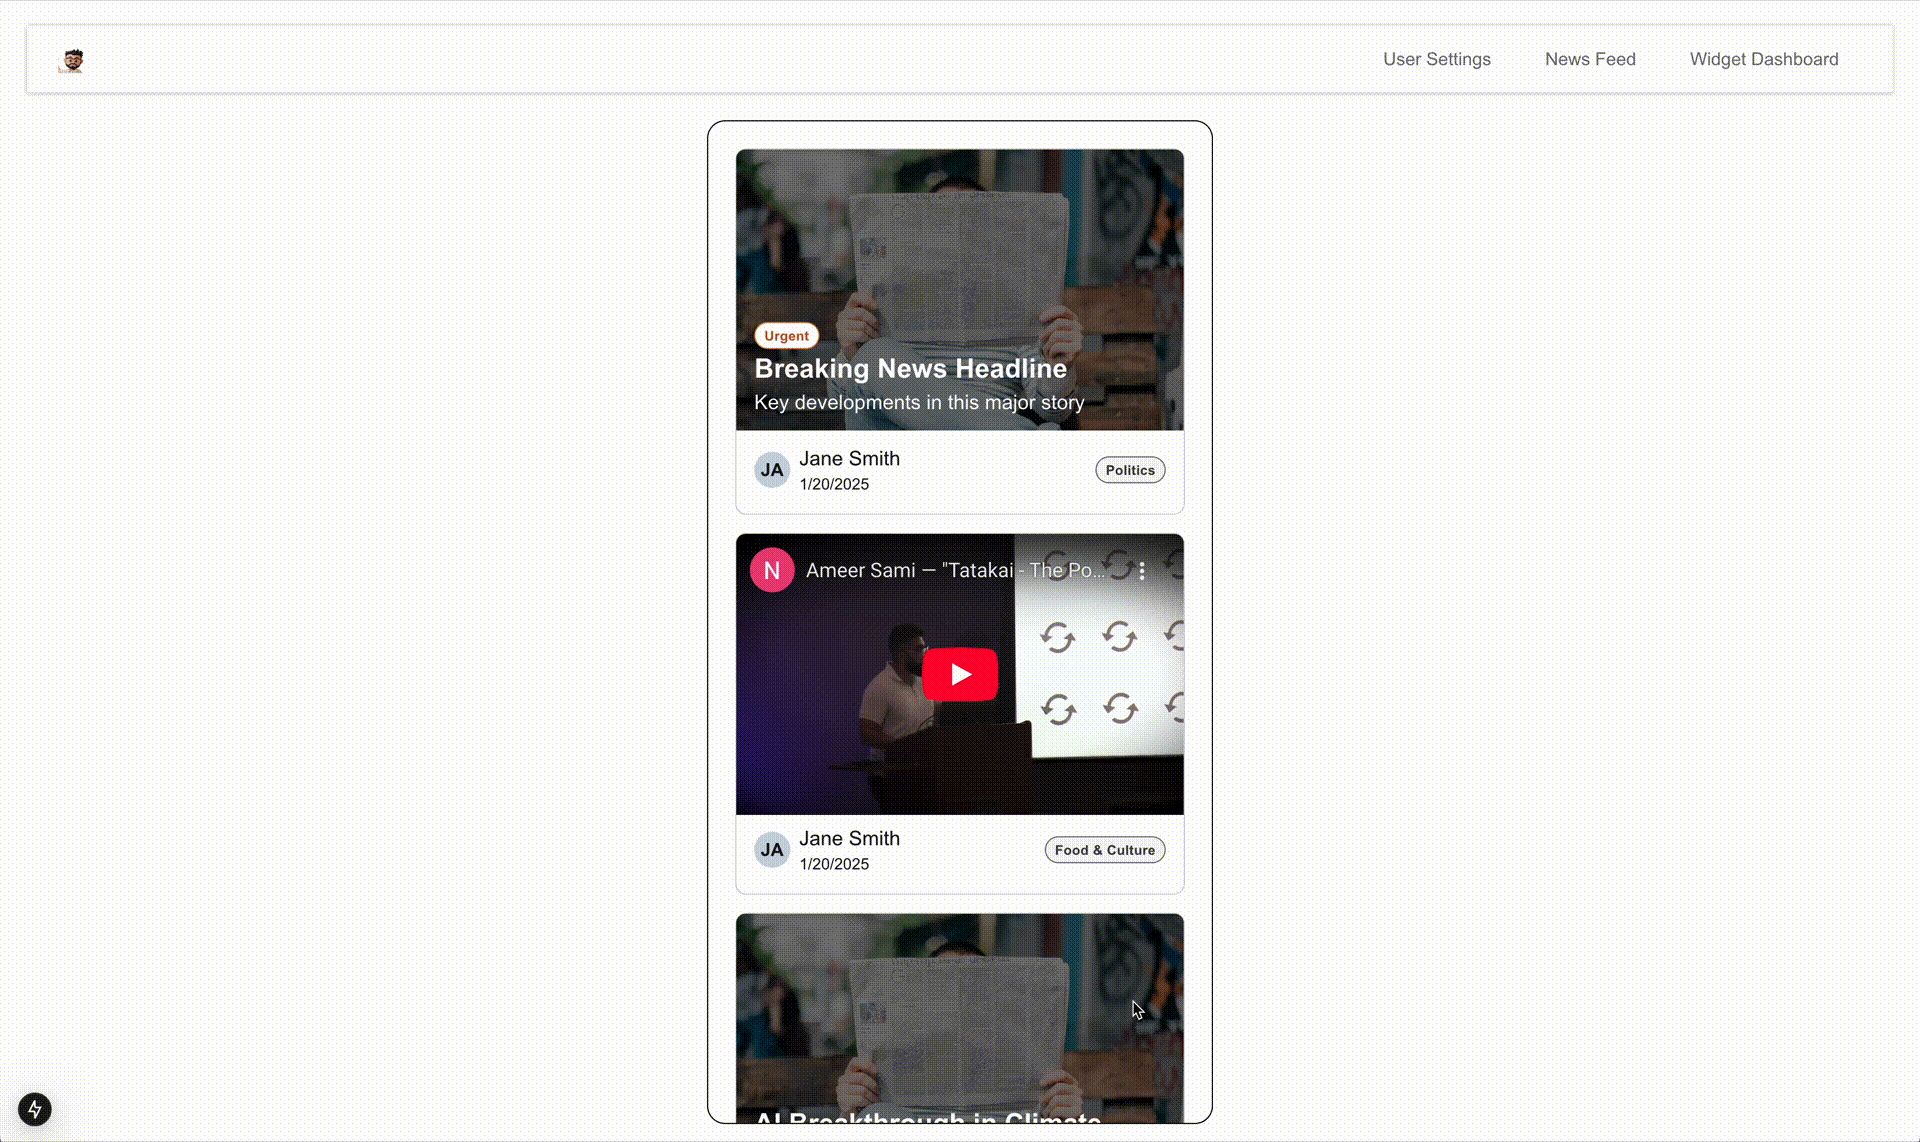
User Settings Example
The first example is a dynamic user settings form. A user selects from a "User Type" dropdown and based on the selection the user makes, different components will render below the email address field. The thing to note in this example is that the form components rendering below the email address field are being dynamically generated based off of the response from a Server Action.

As I mentioned earlier, SDUIs are unique as they allow a server to define a UI through a schema. In all of the examples in this blog post, I utilize a JSON format for the schemas. Below is snippet of the schema that is driving the user settings form in this example. You'll note that there is a components array which contains objects that represent the individual components to render in the UI. There is no standard for SDUIs so this is a schema that I have created on my own.
{
  "type": "form",
  "title": "User Configuration",
  "components": [
    {
      "type": "select",
      "id": "userType",
      "label": "User Type",
      "required": true,
      "options": [
        {"label": "Individual", "value": "individual"},
        {"label": "Business", "value": "business"},
        {"label": "Developer", "value": "developer"}
      ],
      "defaultValue": "individual"
    },
    {
      "type": "textInput",
      "id": "email",
      "label": "Email Address",
      "required": true,
      "validations": {
        "email": true
      }
    }
    //...
  ]
}
Now if we look at the root component for this user settings page we'll see that it is fairly simple. It is a Server Component, which allows us to invoke async code directly within the component. In this case we are invoking a function titled, getUserSettingsComponents, which returns to us an array of JSON data, representing the initial components to render. We then iterate over this array of components and pass each component object to a component titled, <UserSettingsComponentFactory/>, which determines what form component to render based off the JSON data provided. These components are then passed as children to a client component titled, <UserSettingsForm/>, which handles all of the interactivity. By rendering these components in the parent Server Component and then passing them as children we are able to improve the first paint performance of this page, a common benefit of utilizing Server Components.
const UserSettingsPage = async () => {

  const initialComponentState = await getUserSettingsComponents([]);

  return (
    <div className={styles.container}>
      <UserSettingsForm>
        {initialComponentState.map(component => <UserSettingsComponentFactory {...component} />)}
      </UserSettingsForm>
    </div>
  );
}
Within the <UserSettingsForm/> client component we will see that we are utilizing the useActionState hook which accepts a callback function and default/initial state as params. The callback function provided is invoked when the action that is returned from the hook is invoked. The nice thing about the callback we provide to this hook is that it can perform async actions such as fetching data from an API or in this case, a Server Function. You may have noticed that we are invoking the same getUserSettingsComponents function that we invoked in the parent Server Component. What happens under the hood for us in this case, is that this Server Function is auto-magically converted into an API of sorts that we can invoke from the client side. The return from this function is the same as when invoked from the parent Server Component, which is an array of objects representing components to be rendered. On the client side however we are dynamically retrieving the set of components to render based on the selection the user has made in the "User Type" dropdown. We dynamically retrieve these components by invoking the submitAction returned from the hook which in turn invokes the callback function and invokes the Server Function. The returned array of JSON objects is then set to the state variable that is returned from the hook.
const [state, submitAction, isPending] = useActionState<Array<FormComponent>, ChangeEvent<HTMLFormElement>>(
  async (previousState, newComponentData) => {

    const newData = new FormData(newComponentData.target);
    const convertedComponentData = Array.from(newData.entries()).map(([id, value]) => ({
      id,
      selectedValue: value
    })) as Array<FormComponent>;

    const newComps = await getUserSettingsComponents(convertedComponentData);

    return newComps;
  },
  []
);
Lastly, what is returned from this client component is a HTML form element, which renders the children that are passed to this client component from the parent Server Component, which are Server Components. Adjacent to those children we iterate over the array of new components we retrieve based on the users selection of "User Type" and render the components accordingly.
<form
  className={styles.form}
  onSubmit={handleSubmit}
>
  {props.children}
  {state.map(component => <UserSettingsComponentFactory key={`fetched-component-${component.id}`} {...component} />)}
</form>
We are improving the first paint performance by utilizing Server Components to render the initial components for this SDUI form and we have improved the developer experience (DX) by utilizing the useActionState hook to more easily maintain state and invoke actions. We however are still encountering a performance issue where rendering the dynamic aspect of this form has to be done on the client side by iterating over the array of JSON objects returned from the Server Function. We can improve this which I will show in the next example.
News Feed Example
This news feed example dynamically loads the next set of components, in this case posts, after the user reaches a specific scroll position.
The root component for this news feed example is again very simple just like in the user settings example. This root component is a Server Component. In which we invoke a function titled, getPosts which returns the initial set of posts to render within the news feed. What is happening differently in this case is that this function is returning to us Server Components instead of an array of JSON data that we have to iterate over. This allows us to render the components immediately after being returned from this function instead of requiring the component to iterate over the array and determine what component to render. This has no impact in the Server Component but will come in use in the client <NewsFeed/> component in a moment.
const NewsFeed = async () => {

  const Posts = await getPosts(0);

  return (
    <div className={styles.container}>
      <div className={styles.phoneContainer}>
        <NewsFeed>
          {Posts}
        </NewsFeed>
      </div>
    </div>
  );
};
The client component utilizes the useActionState hook just like in the user settings example. In this case we invoke the getPosts function but as a Server Function. Just like in the parent Server Component, this function returns to us Server Components instead of an array of JSON objects. By doing this we can offload the work of interpreting the JSON array into the correct components onto the server from the client. We then can leverage caching on the Server Function level to cache these Server Component responses to improve the performance of the SDUI as the UI then only has to render the components and not interpret the schema data which can be very large and complex in some cases.
const [state, submitAction, isPending] = useActionState<Array<any>, number>(
  async (previousState, newOffset) => {
    const newComponents = await getPosts(newOffset);

    if (!newComponents) {
      return previousState;
    }

    return [
      ...previousState,
      newComponents
    ];
  },
  [],
);
What this allows us to do is simplify the return block of the client component to no longer requiring iterating over the JSON SDUI schema and instead only concern itself with rendering the components that the Server Function provided.
<div
  ref={scrollContainerRef}
  className={styles.scrollContainer}
>
  {children}
  {state}
</div>
This magically Server Function is fairly simple in its implementation. At the very top we use the use server directive that instructs the framework that this a server function and not a normal function to be bundled. We then retrieve the next set of posts for the user as an array of JSON objects. Instead of returning the JSON array we perform the work of iterating over the array in the Server Function and return an array of components, Server Components to the component invoking this function. Most frameworks will automatically apply caching to the server function and each one does it differently so I won't go into that here but we can leverage caching to cache the response from this Server Function.
'use server';

export default async (offset: number) => {
  const slicedPosts = posts.slice(offset, offset + 5);

  if (!slicedPosts.length) {
    return null;
  }

  return slicedPosts.map(post => (
    <NewsFeedFactory key={`news-feed-post-item-${post.id}-${post.author}`} post={post as NewsPost} />
  ));
};
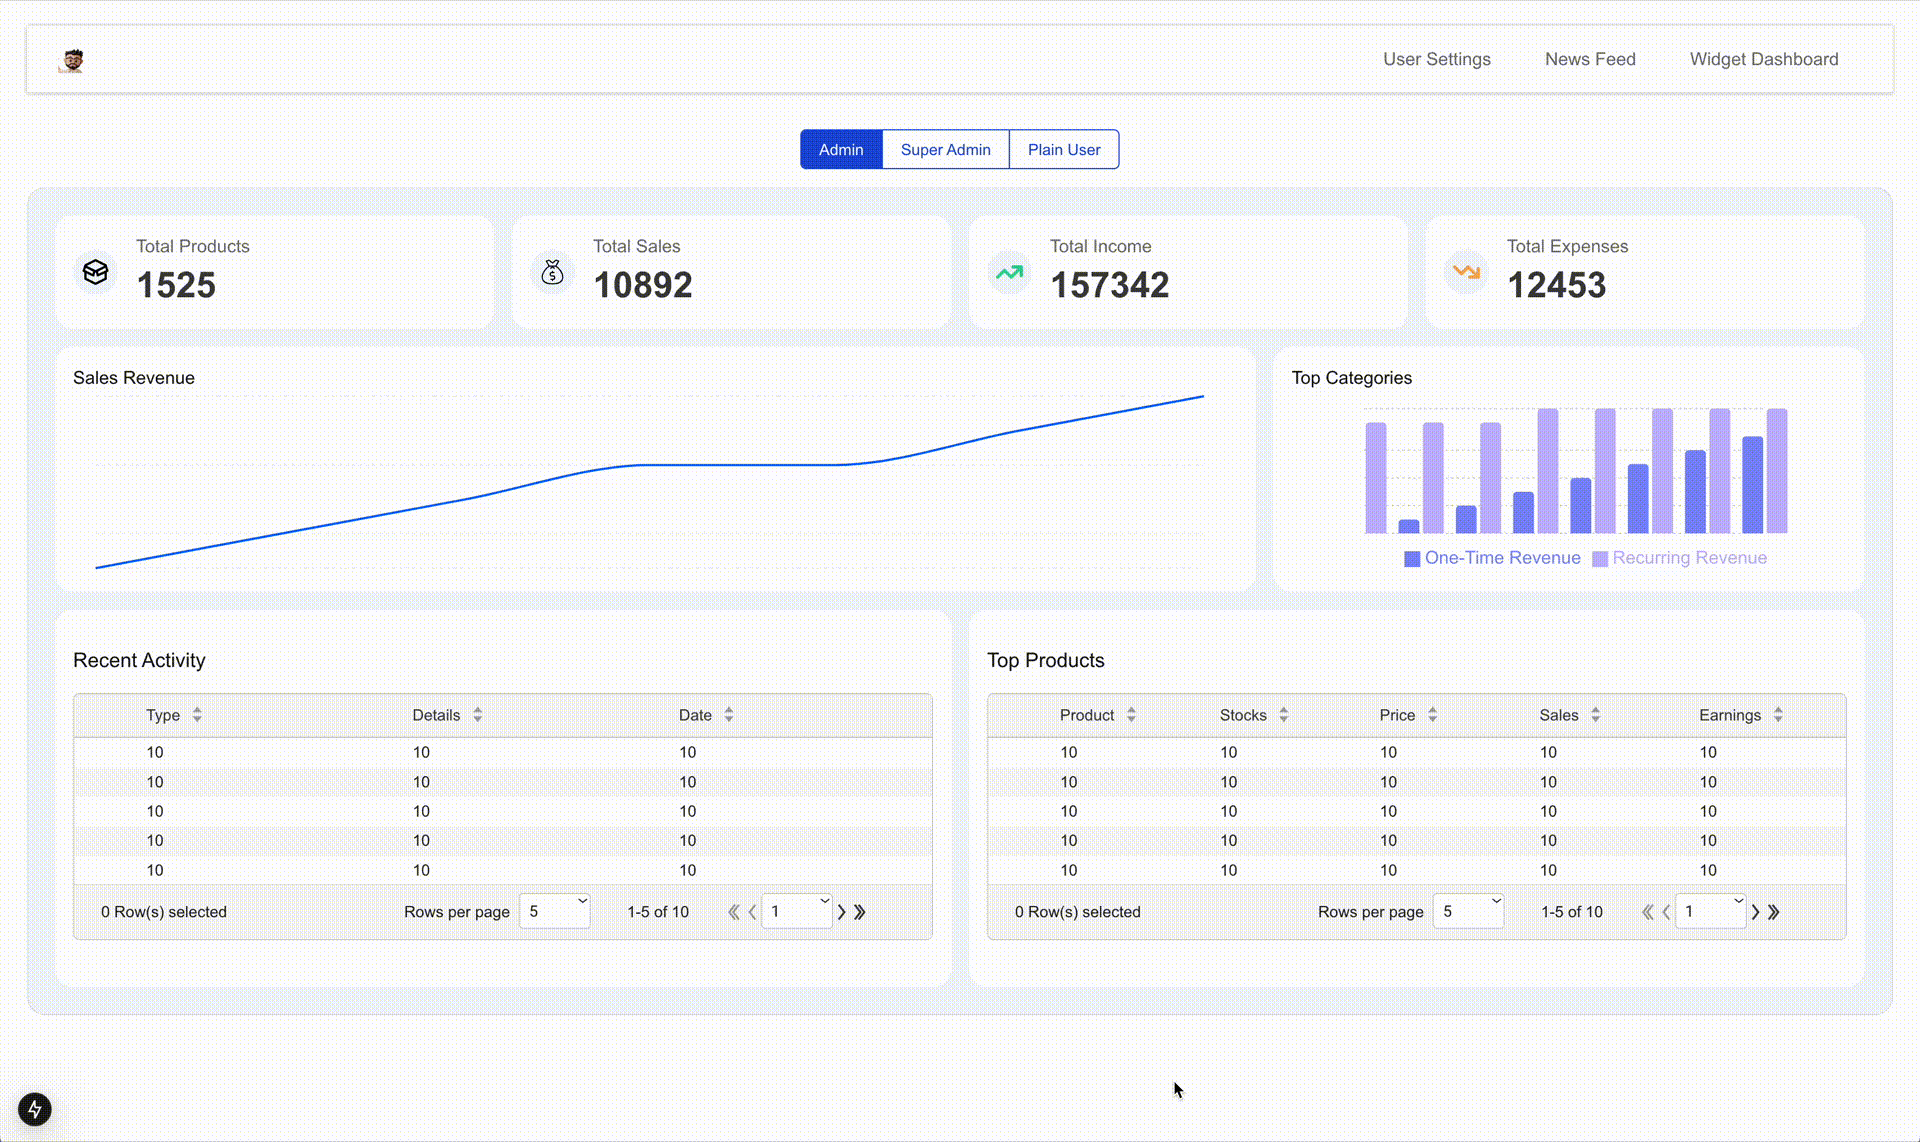
Widget Dashboard Example
The last example showcases the power of SDUI and React 19 together. This dashboard utilizes the same code to render 3 completely different layouts. The only thing that is changing across the 3 variations is the JSON schema being feed to the UI. In this case the parsing of the JSON schema is done on the server component level and by doing so, the change of layouts is almost instantaneous.
Thank you!
Hope you were able to get a better understanding of SDUIs and how you can more easily construct SDUI applications with some of the new features released in React 19. Please feel free to reach out to me on BlueSky if you have questions. The slides from my talk and a link to the GitHub with the code for these examples can be found below.
Special thank you for those of you who were able to attend the meetup and here the talk this blog post is based off of in person!


Source Code & Slides
- GitHub Repo
- Slides